一如既往的前言
在渗透测试过程中发现目标网站所用的编辑器是UEditor,百度发现UEditor在1.4.3.1版本的时候修复了一个SSRF漏洞,后面又看到l3m0n师傅写了一篇UEditor 1.4.3.3的SSRF绕过方法,其中提到了DNS重绑定攻击。DNS重绑定攻击在网上理论偏多,所以记录复现过程。
从代码看过滤
代码片段在ueditor\php\Uploader.class.php的第173行附近,如下:
1 | private function saveRemote() |
整个流程大概如下:
1、判断是否是合法http的url地址
2、利用gethostbyname来解析判断是否是内网IP
3、利用get_headers进行http请求,来判断请求的图片资源是否正确,比如状态码为200、响应content-type是否为image
4、最终用readfile来进行最后的资源获取,来获取图片内容
Bypass
这里记录两种Bypass方法,第一种是l3m0n所提到的DNS重绑定,除此之外,还有简单的bypass:利用preg_match('/(^https*:\/\/[^:\/]+)/', $imgUrl, $matches);的缺陷进行绕过。
DNS重绑定Bypass
我们可以通过DNS重绑定让gethostbyname解析URL时获取到的IP为公网IP,第二次get_headers请求URL时转到攻击者已经搭建好的Web服务上,第三次readfile时DNS解析的IP为内网IP,简单的说就是:
第一次解析 -> 任意公网IP
第二次解析 -> 攻击者搭建好的服务器,满足status=200,content-type为image
第三次解析 -> 内网IP
DNS重绑定实现
这里使用DNS重绑定的实现方法是自建DNS服务器的方法,具体过程如下:
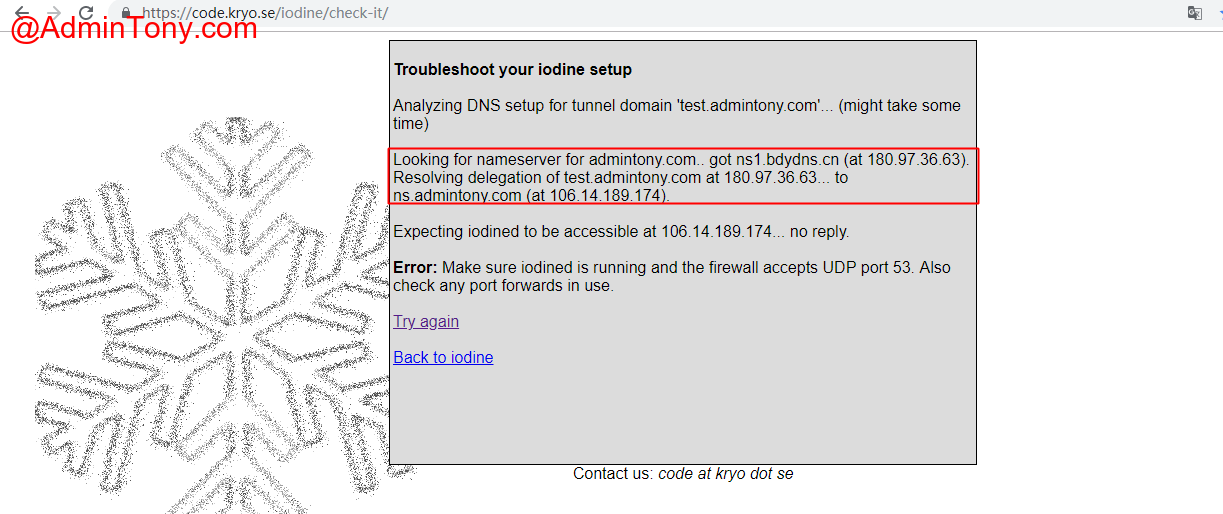
1、设置域名解析。
这里需要将自己的域名设置一个NS记录和一个A记录,如下:

NS记录表示test.admintony.com的所以子域名由该DNS服务器进行解析,A记录将DNS服务器指向了具体的IP,这样就可以使用自建的DNS服务器进行解析了,配置好以后可以用link测试一下,出现以下信息则为设置成功:
2、搭建DNS服务器。
这里需要使用python的twisted库中的name模块编写符合自己需求的DNS服务器,代码如下:
1 | #coding : utf-8 |
然后运行dnsServer后,ping test.admintony.com查看解析:

到这里就可以完成指定的三次解析了。
绕过Content-type限制
使用定制的web代码即可,代码如下:
1 | from flask import Flask, Response |
SSRF深入内网
payload为:/ueditor/php/controller.php?action=catchimage&source[]=http://test.admintony.com/?aaaa.jpg

查看图片内容:
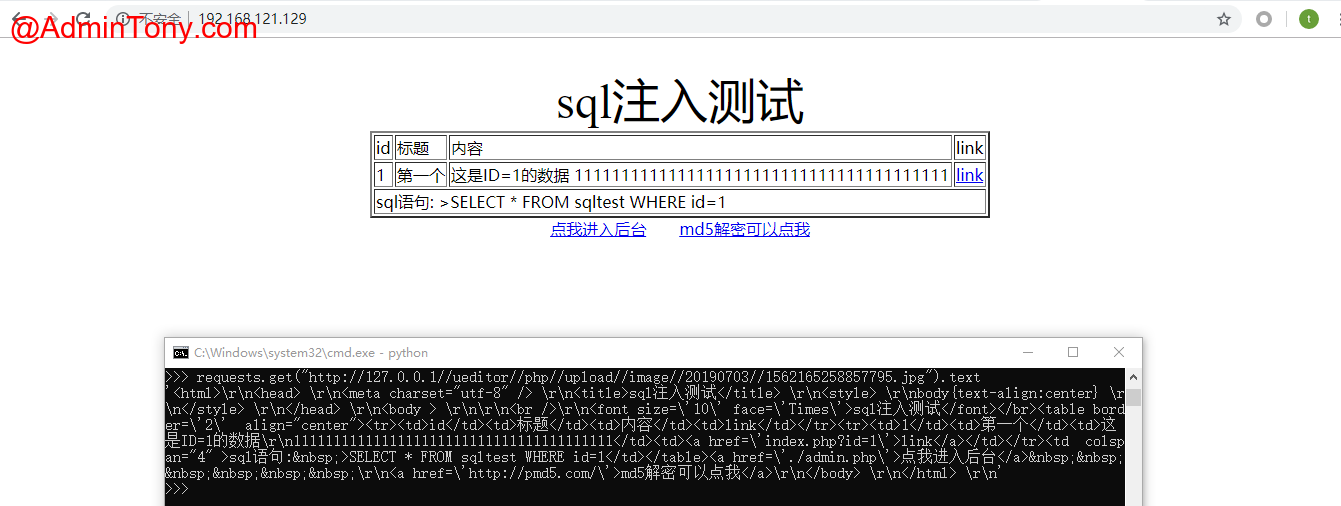
可以看到已经成功的访问到内网192.168.121.129的资源了,但是这个方法不稳定,需要多次测试才能获得正确结果。
利用正则缺陷
提取域名的正则在文件的184行,如下:
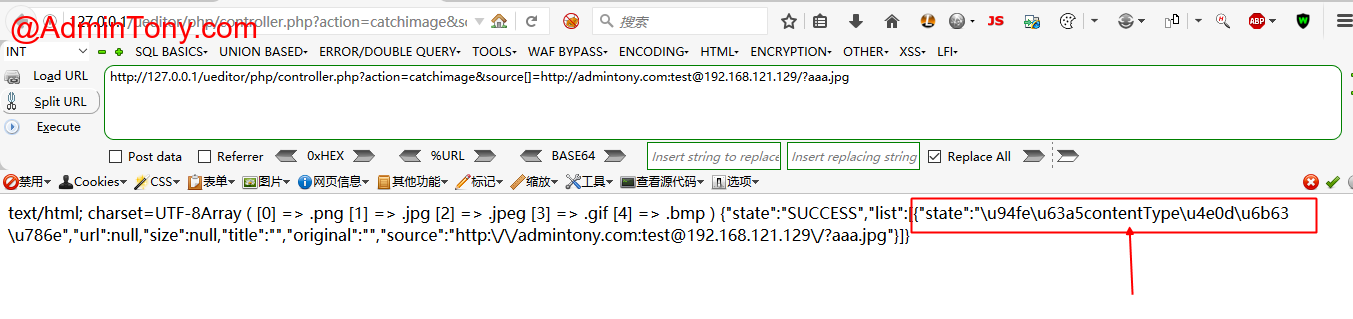
1 | preg_match('/(^https*:\/\/[^:\/]+)/', $imgUrl, $matches); |
对于:http://admintony.com:test@127.0.0.1/aaa.jpg,其匹配结果为:http://admintony.com,如下图:

那么gethostbyname其实就是对admintony.com进行的,其解析肯定是外网IP,所以该层过滤可以被绕过。
这种方法只能用于内网存活IP的探测,因为其无法绕过Content-type校验。
当ip:port 可以访问时,提示“链接contentType不正确”,返回值state为\u94fe\u63a5contentType\u4e0d\u6b63\u786e,而且响应速度会很快,如下:
当ip:port 不存在时,提示“链接不可用”,即返回的state为\u94fe\u63a5\u4e0d\u53ef\u7528,而且相应速度很慢,如下图:
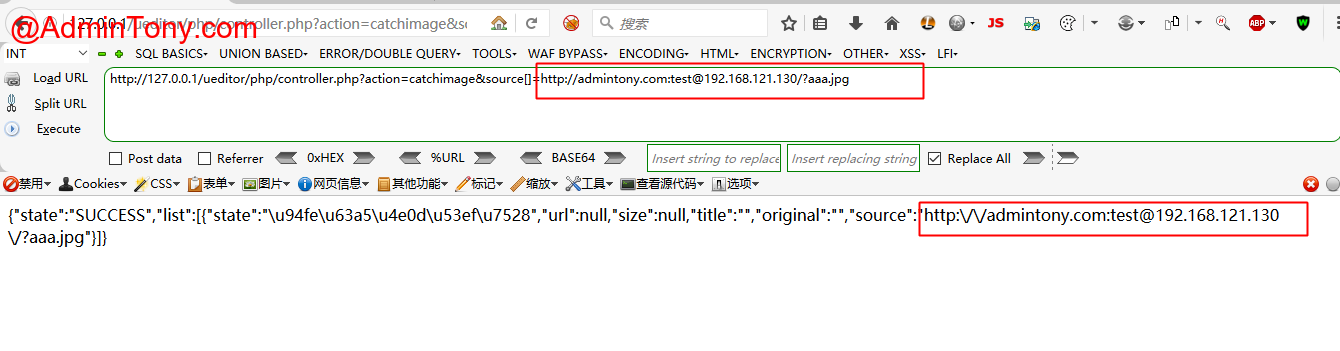
由此进行内网探测。
TIPS
最后提一下:在AWD中,很多php CMS的攻破点可以放在编辑器的SSRF上面,UEditor的SSRF可以试一下哦。